
Installing office cubicles may not seem like an easy task at first, especially when time is short and space is limited.
Can an office cubicle really be assembled in 30 minutes?
The answer is: yes, of course, if you use the right model, with pre-configured components, and follow clear instructions.
To assemble an office cubicle in 30 minutes, use a modular, tool-free system.
Start by organizing the parts, then connect panels to corner posts, add side panels, attach the desktop, and finish with accessories and cable management.
No tools needed, just follow the layout and snap pieces into place.
In this article, we provide a quick, simple, and practical step-by-step guide to assembling a cubicle in under half an hour, from space preparation to connecting components and managing cables.
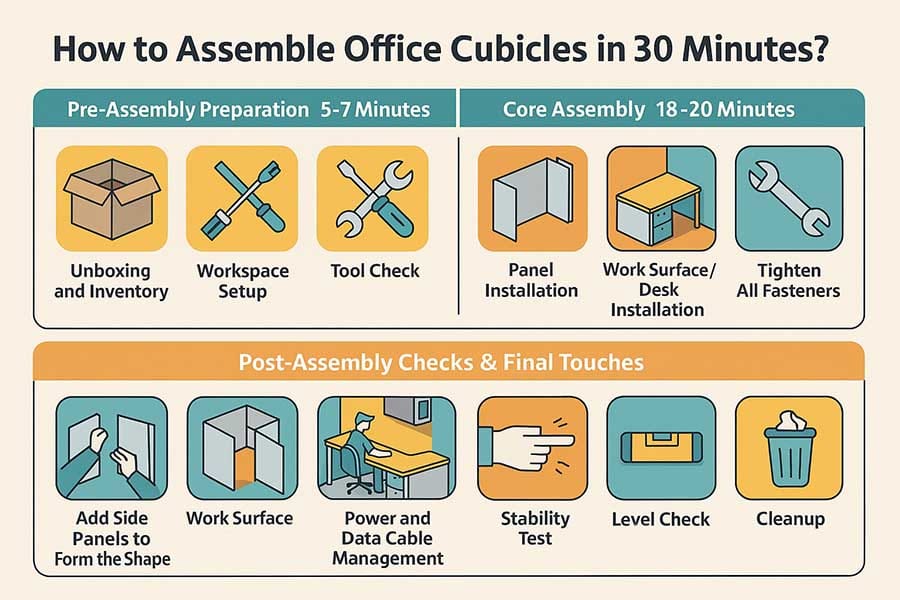
1. Pre-Assembly Preparation (5-7 Minutes)
- Unboxing and Inventory: The first important step before starting to assemble the office cubicle is to unpack the boxes carefully to avoid damaging the parts.
If you cannot find any part or find that it is damaged, you should notify the seller or supplier immediately so that you can receive a replacement part promptly, and your installation process is not delayed.
After opening each package, compare all parts with the parts list or installation manual to make sure nothing is missing or damaged.
- Workspace Setup: Before starting assembly, the space required for installation must be completely clean and prepared.
Consider a space large enough to allow you to move freely around the partition and move pieces around easily.
Also, to protect the floor, it is best to cover the installation area with cardboard, cloth, or a protective covering.
- Tool Check: For quick and easy installation, prepare the necessary tools before you begin.
Basic tools include screwdrivers, Allen wrenches, a utility knife for opening packaging, a tape measure for precise measurements, and a level to ensure that the pieces are straight.
Modular office furniture is typically designed for quick, tool-free assembly and often comes with simple, screwdriver-free connection mechanisms.
- Reviewing Instructions: Even if you are already familiar with the modern office cubicle model, a quick review of the manual or assembly instructional video can prevent mistakes.
It’s best to review key parts like connection points and panel orientation in mind.
This means you don’t need to stop to double-check during assembly, making the installation process faster and more hassle-free.
You Might Also Enjoy: Who Sells Top-Rated Modular Office Cubicles? 2026 Guide
2. Core Assembly (18-20 Minutes)
A. Panel Installation
First, identify the base panels.
These panels are usually located at the bottom of the cubicles and are slightly wider to provide structural strength.
Then connect the first two panels using joining hardware such as cam locks, locking clips, or brackets.
Make sure that these two panels have a perfectly perpendicular and stable angle.
B. Add Side Panels to Form the Shape
Next, install the remaining panels in sequence around the perimeter of the private office cubicle; each new panel should be attached to the previous panel and, if applicable, to the corner or end posts.
The important thing is to initially tighten all screws and connections only by hand and lightly so that you can make any necessary adjustments if needed.
At the end of this step, using a tape measure and the diagonal measurement method, make sure the panels are square and perfectly aligned.
Also, use a level to adjust the verticality of the panels so that the bases are perfectly flat and level.
C. Work Surface/Desk Installation
In the assembling office cubicle process, after installing the panels, it’s time to install the work surface.
First, identify the mounting locations for the brackets or pre-drilled holes on the panels.
Then secure the necessary retaining brackets to the panels.
Next, carefully lift the work surface and place it on the brackets.
Finally, secure the work surface to the brackets or panels using the included screws or special screws to make the work surface stable and sturdy.
D. Power and Data Cable Management
If the panels have raceways in their base, route power and data cables through these raceways.
Otherwise, use special clips or fasteners to organize and secure the cables to prevent them from getting tangled.

You Might Also Enjoy: Where to Find the Best Acoustic Office Cubicles? 2026 Guide
E. Storage/Accessory Installation
At this stage of assembling office cubicles, install additional components such as overhead boxes, shelves, and drawers.
First, find the mounting location and hardware for the upper boxes and shelves and attach them to the top of the panels.
In the case of drawers and small cabinets, if these components are placed on the floor, place them inside the partition space; but if they are installed suspended under the work surface, attach them to the underside of the table using brackets.
Other accessories, such as whiteboards, pin boards, or monitor arms, must also be installed according to their instructions; these are usually attached to the panels with screws or hooks.
3. Post-Assembly Checks & Final Touches (2-3 Minutes)
A. Tighten All Fasteners
After assembling the office cubicles is complete, go back and recheck all bolts, nuts, and cam locks and tighten them completely.
Be careful not to overtighten, as this may damage the parts or cause cracks in the joints.
B. Stability Test
To ensure that the structure is completely stable, gently push the partition from several sides or push it slightly back and forth.
If it feels loose or moves abnormally, recheck and adjust the feet and connections.
C. Level Check (Final)
Once again, using a level, check the vertical and horizontal position of the structure to make sure everything is exactly straight and level.
If any adjustments are needed, use adjustable stands to correct the position.
D. Cleanup
Finally, collect and dispose of packaging, plastics, boxes, and other waste from the installation.
Leave the workspace clean and tidy so it is ready for use.

You Might Also Enjoy: Who Sells the Best Office Cubicles for Small Businesses? 2026
Tips for Achieving the 30-Minute Goal
- Read the instructions: Even if you don’t have much time to assemble cubicles, have a quick, concise review of the manual or installation instructions.
This will help you familiarize yourself with the general steps and avoid potential mistakes, which will ultimately reduce installation time.
- Lay out all parts logically before starting: Before you start assembling cubicles, arrange all the parts neatly.
This eliminates the need to search for or find parts while working, making the installation process faster and smoother.
- Work with a partner if possible: Working in pairs can greatly speed up the installation and allow many steps to be completed simultaneously.
However, even if you are alone and have a simple cubicle model, installation is quite possible in 30 minutes.
- Don’t rush and focus on accuracy: In the early stages of assembling cubicles, focus more on the accuracy and precision of the connection of the parts so that you do not have to correct or reopen the work later.
Following this tip will greatly help save overall installation time and prevent costly mistakes.
- Use a rubber mallet and bubble level for balance: For precise adjustment and to prevent damage to parts, it is best to use a rubber hammer that delivers soft, controlled blows.
Also, bring a bubble level to make sure all panels and surfaces are installed perfectly flat and level.
- Wear gloves to keep surfaces clean: Be sure to wear work gloves to prevent getting dirty or scratching panels and tables.
This also prevents direct skin contact with sensitive parts and helps maintain the cubicles’ beautiful, professional appearance.
- Avoid connecting multiple power strips in series: To maintain safety and prevent possible electrical hazards, never connect multiple power strips in series.
This may cause an additional load on the power supply system and increase the risk of fire or device failure.
Conclusion
It is easily possible to successfully assemble office cubicles in 30 minutes using modular cubicles.
By following a clear step-by-step process that we’ve outlined in this article, preparing properly, and using the right tools, you can quickly create a professional and efficient workspace.
This optimized installation reduces downtime and disruptions, and increases productivity in the office environment, making it ideal for startups, remote teams, and small offices.
With practice and experience, your confidence in assembling office cubicles will increase, and subsequent processes will go faster and smoother.
Use this step-by-step guide to assemble office cubicles and witness a transformation in the speed and quality of your office setup.

John Ofield is a recognized expert in the office furniture and office cubicle industry in Houston, TX, with over 40 years of experience. As the founder of ROSI Office Systems, he specializes in furniture space planning, custom cubicle designs, modern office chairs and tables, and high-quality commercial furniture. John’s expertise helps businesses enhance productivity and collaboration. He is also dedicated to mentoring entrepreneurs and redefining workspaces to inspire success.